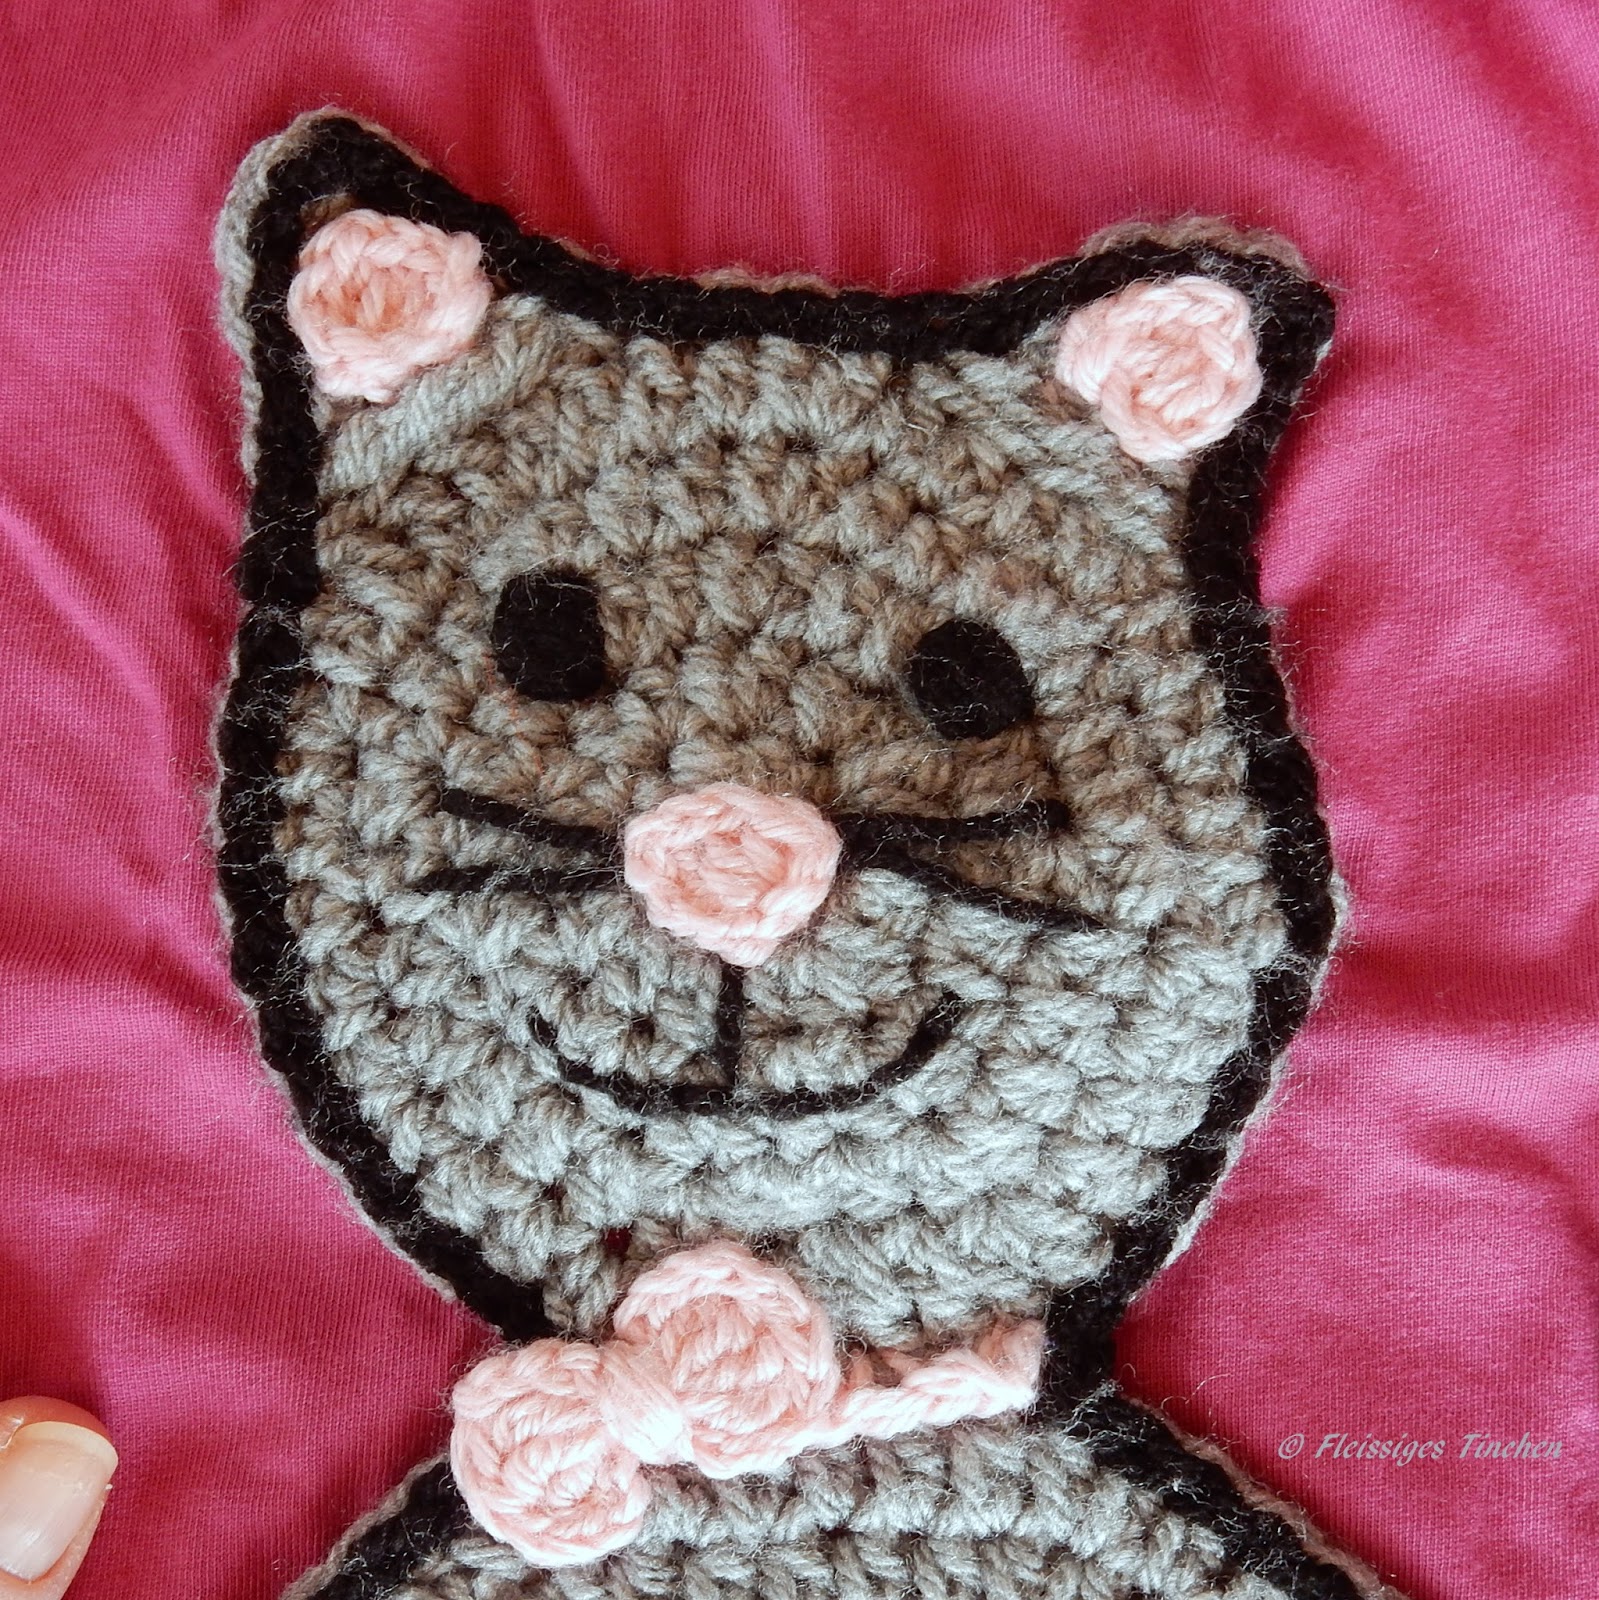
I have used a 4,5 hook and a matching yarn, however you can easily adjust the size of the applique by using a smaller or a larger hook and yarn. The applique was made for my daughter's shirt in size 5T.
Cat Applique Pattern:
Abrevations:
|
CH
|
=
|
Chain
|
|
HDC
|
=
|
Half Double Crochet
|
|
SL ST
|
=
|
Slip Stitch
|
|
DC
|
=
|
Double Crochet
|
|
SC
|
=
|
Single Crochet
|
|
HTR
|
=
|
Half Treble Crochet
|
|
ST
|
=
|
Stitch
|
|
TR
|
=
|
Treble Crochet
|
|
REP
|
=
|
Repeat
|
|
DTR
|
=
|
Double Treble Crochet
|
|
|
||||||
|
Rd.
|
=
|
Round
|
|
Rw.
|
=
|
Row
|
The pattern is written in US Terms!
Important:
Do not join the rounds with sl st, except it is mentioned clearly!
You should use some yarn or other little helper to mark the beginning / end of your rounds!
You may make and sell products from my patterns but if you do I ask that you link back to my post. Please do not copy and post this pattern and claim it as your own. Please do not re-publish photos as your own.
1) Body:
- start with a magic ring and 8 HDC in the ring, close the ring but do not join (= 8 ST)
- 2 HDC in each ST (= 16 ST)
- 2 HDC in the first ST, 1 HDC in the next ST, REP around (= 24 ST)
- 2 HDC in the first ST, 1 HDC in the next 2 STs, REP around (= 32 ST)
- 2 HDC in the first ST, 1 HDC in the next 3 STs, REP around (= 40 ST)
- 2 HDC in the first ST, 1 HDC in the next 4 STs, REP around (= 48 ST)
- 2 HDC in the first ST, 1 HDC in the next 5 STs, REP around (= 56 ST)
- 2 HDC in the first ST, 1 HDC in the next 6 STs, REP around (= 64 ST)
- Starting now with the cat's tail: chain 33
- Back from the second ST from hook:
- 1 DCin 1 ST, 2 DC in 1 ST, REP 5 x totally
- 1 DCin 1 ST
- 1 DCin 1 ST
- DC2TOG REP 10 x totally (until end)
- Skip 3 ST at the body, join the tail with a SL ST in the 4th ST at the body
- Fasten off and leave a long yarn end for sewing
2) Head:
- start with a magic ring and 8 HDC in the ring, close the ring but do not join (= 8 ST)
- 2 HDC in each ST (= 16 ST)
- 2 HDC in the first ST, 1 HDC in the next ST, REP around (= 24 ST)
- 2 HDC in the first ST, 1 HDC in the next 2 STs, REP around (= 32 ST)
- Now we increase to 40 ST, but for the cheeks we want to crochet DC instead of HDC:
*2 HDC in the first ST, 1 HDC in the next 3 STs*, REP from * to * totally 2 times,
then 2 HDC in the first ST, 1 HDC in the next ST, then 1 DC in the next 2 STs,
then 2 DC in the first ST, 1 ST in the next 3 STs (= the 20th ST)
then repeat this complete part once again until the end of the round:
*2 HDC in the first ST, 1 HDC in the next 3 STs*, REP from * to * totally 2 times,
then 2 HDC in the first ST, 1 HDC in the next ST, then 1 DC in the next 2 STs,
then 2 DC in the first ST, 1 ST in the next 3 STs (= 40 STs totally) - Now we crochet the ears: 1 SL ST in the next 5 ST
- CH 6, back from the second ST from hook
- 1 HDC
- 1 DC
- 1 HTR
- 1 TR
- 1 DTR
- Skip 4 ST at the head, 1 SL ST in the 5th ST and in the next 4 ST
- CH 6, back from the second ST from hook
- 1 HDC
- 1 DC
- 1 HTR
- 1 TR
- 1 DTR
- Skip 4 ST at the head, 1 SL ST in the 5th ST
- Fasten off and leave a long yarn end for sewing
3) Nose, inner ears:
(3 x totally: 2 x with 4,5er hook (= ears), 1 x with smaller hook (= nose)
- CH 4, back from the second ST from hook
- 1 HDC
- 1 DC
- 1 HTR
- CH 1, add 2 SL ST at the side of the HTR, 1 SL ST in the corner, 1 SL ST in the ST next to the corner
- Fasten off and leave a long yarn end for sewing
4) Bow:
You can find a lot of bows on Ravelry or other sides on the Internet. Most of them are free.
The pattern I used is made with TR. The thread at the beginning and the end is very long, because you have to wrap it round the middle of the bow and also use it for sewing it to the cat.

5) Finish:
- Sew head and body together
- Add yarn in another color somewhere at the cat and hook 1 Rd. SL ST (not too tight!!!) around the complete cat - this leads to a higher stability of the complete application.
- Sew the inner of the ears onto the cat
- Sew the nose onto the cat
- Stitch eyes, whiskers and mouth onto the cat
- Add a row of SC at the joint between cat body and head, alternatively work CH and sew to the neck. Then add the bow.
- Weave in all ends
- I used a fabric glue to add the cat to my shirt

I hope you enjoyed the pattern and have fun with your cat.
If there is something wrong, please send me an email or leave a comment!
Have a nice day and happy crocheting!
Martina
Keine Kommentare:
Kommentar veröffentlichen